Thursday, December 18, 2008

So close we can TASTE it...

The kitchen is so close to being completed, we can taste it (*pun intended*). The cabinets are officially painted and have been delivered to our house.

Newly painted cabinets, fresh off the delivery van.


I'm not sure that we'll wrap everything up by this Saturday as planned, but it will be - for the most part - a functional kitchen. One with running water, countertops (let's call them "work surfaces" for now), and appliances. You know - things you take for granted when you have them but desperately miss when you go without for a few months.

The first wall cabinet hung; two floor units awaiting installation.


We will (hopefully) finish the plumbing under the sink and install the last of the cabinets tonight. Blair's dad came over last night and helped us for a good 7 hours. I'd say we have another 3 to go.

The first three units and the sink in place. The garbage disposal installation has begun.


After that, we have to get our counter tops ready, install the trim atop the counters, and then install the backsplash. I don't want to give too much info away (the materials we are using are TOP SECRET) - so you'll have to check back to see the final product.

The whole shebang on our main wall. The dishwasher will go to the right of the sink, and an 18" cabinet that we repurposed will go on the opposite wall next to the stove.


Brand new faucet over our newly refinished vintage porcelain sink. Good stuff.

Wednesday, December 10, 2008

A long time coming...

After working through a few scheduling conflicts, the painting is finally under way. Hold ups in my company's production schedule and a sick friend in the painting department pushed our project back about a week and a half. Luckily Chris has agreed to stay after work the next few nights to help me wrap them up before the weekend. It's a little hard to tell how the finished product will turn out at this point, but I'm LOVING the color so far.

The final coat won't be quite as glossy as the photos below (we went with the "Satin" finish as opposed to the "High Gloss" - which were our only two choices). These photos were taken mid-process before everything had a chance to dry.

We've got three gallons of lacquer paint called DuraLac that we picked up from Benjamin Moore to do the entire job. Total cost: about $97 bucks. I don't know the name or number of the color off hand (so don't ask ;)). I basically walked up to the color swatches, saw it and told the guy behind the counter, "THAT'S THE ONE!"

NOTE: A little birdie told me that the wood shop is working on a little "somethin' somethin' " for the counter tops. Keep an eye open for progress pics on that. Also, custom tiles for the backsplash come in this Friday. BIG weekend ahead of us!


Our lovely cabinets, pre-prime and paint. (Don't you just LOVE the color? Ha.)


First coat on the bottom-side of the drawers. All red and sexy.


Backside of the doors, looking a little glossy in the gleam of the flourescent paint booth lights.

Tuesday, December 2, 2008

NEW! Custom Cabinet Emblem

Big thanks to our friend Ray who runs the router here at my company. I showed him the design I created a couple weeks ago, and he ran with it. He created the paths in his spare time and used some scrap materials he had laying around.


Ray watching over the delicate mirrored acrylic.


One of the three routers our company uses.


Closeup of the tiny router bit doing it's job.


Computer programs used to create the paths.


All of the white you see was plowed from a single piece of 1/4" "Pure White" acrylic. The metallic border and letters were routed from 1/8" mirrored acrylic and inset into the white piece.

Individual pieces of the puzzle.


The pictures don't do it justice (taken with my camera phone) - this thing is SEXY in real life. Can't wait to see it installed on the newly painted cabinets. Thanks Ray.


The new piece fully assembled = *BLING*

Sunday, November 30, 2008

Merry Christmas to Us

There has been some talk of replacing the plumbing in our basement "somewhere down the road," but we were pleased when Blair's dad showed up with tools and supplies in hand the day after Thanksgiving to do it for free. Well, not "free" free (it's our joint Christmas present) - but it's one less item we have to pay for out of our pocket.

Granted, new plumbing isn't exactly a gift either of us would think to ask for, but based on the condition of the old galvanized pipes (see photo below) - we were EXTREMELY excited. Thanks Rodney!


The water supply pipes in our basement were made of galvanized steel (which is very susceptible to corrosion and build-up). This is what nearly 50 linear feet of pipe looked like in our basement. Gross.


Old galvanized pipe running into the house past the water meter. We eventually placed a shutoff valve here to control the water source of the entire home.


The old cold water pipes (which were all replaced) were wrapped in areas with an insulated tape to keep them from "sweating" over the pool table.


More tape-covered pipes...


Rodney always comes prepared. He did his homework (as usual), mapping out all of the routes and pieces necessary to complete the job.


Meter box with the new shutoff valve and beginning of the CPVC installed.


Some excellent handy-work: T-joints, valves and 45 degree angles installed perfectly.


Good stuff. "M&R Plumbing" just might have a future!


New copper piping leading up to the kitchen for our new faucet (which we purchased this weekend).

Needless to say, our water pressure is much improved, and it even tastes better! Keep an eye open for updates on the kitchen cabinets, counter tops, and sink this week...

Tuesday, November 25, 2008

Signs of Normalcy

This weekend we were able to tackle a number of projects that have been sitting on our "to-do" list for a while. The main source of motivation is our upcoming holiday party (T-minus four weeks!).

The kitchen gets the majority of our attention these days, primarily because it would be nearly impossible to host a party without a way to cook and refrigerate things. While the cabinets are awaiting final assembly and finish, we tackled a few smaller projects at home.


We put plastic sheeting over our antique pool table and set up our paint station for doors and shelves.


The shelves for our pantry were cut from 1x12" pine, and then painted the same white as the trim in our kitchen. We also cut the bottom off all the doors in (and adjacent to) the kitchen since the new tile raised the floor level by a good three-quarters of an inch.


Inside the pantry, we cut and painted some 1x1" to 12" lengths to give our shelves something to sit on.


Here are the shelves - level and installed. We are really pleased with the yellow walls inside the pantry. (And how much does the Threadless "Cookie and Milk" print rock?)


The top shelf is a little close to the top of the doorway, but I think we'll still be able to put a good amount of food up there (as the ceiling in the closet is 9' tall!).


It's pretty sad that unpacking food and cooking utensils from boxes and placing it onto shelves can provide such a sense of accomplishment. Finishing this job made us realize how much we take the little things (like not having to dig through boxes to find a shaker of salt) for granted.

Monday, November 17, 2008

Old vs. New - You Vote!

We have been debating whether or not to use the original "Republic Steel" emblem from the front of our kitchen cabinets, or replace it with our own custom piece. As much as I love reusing original pieces, there's something nice about putting your own artistic touch into every little project throughout the house.

A friend of ours from work offered to route us a shiny, new custom piece to replace the old, dingy, original Republic Steel piece (below).


Don't worry - if we decide to go with the new routed emblem (design below), we still plan on incorporating the original piece somewhere. It just won't be front and center under the newly re-finished sink. Thoughts?

Sunday, November 16, 2008

Bathroom: The Grand Reveal

We are proud to announce that the bathroom is officially the first room in our home to be considered "finished" (well, as finished as it needs to be for digital photos). Thanks to all who contributed to this gorgeous room (see below for credits)!


Big thanks to Budget Blinds for hooking us up with the great natural-fiber roller shade and valance for the window.


These beautiful prints are by local artist Aline Yamada (a fellow Gahanna-Lincoln grad). Check out her work and/or buy these prints here and here.


The drawer pulls are mix and match glass knobs from Anthropologie, and the cabinet itself is an inexpensive Home Goods find.


Sunday, November 9, 2008

Yellow Walls and Tile Floors

Wanted to post the latest pics of the hallway and kitchen floors. We have one more coat of yellow to do on the hallway walls. We are getting excited to do a really good cleaning of the wood and floors. It's been tough living with so much dust and mess! We also grouted the tile in the kitchen this weekend. Last week we took our kitchen sink to my dad's neighbors (Porcelain Professionals) to have it refinished. So, the kitchen is coming along.

Enjoy!


We painted the pantry yellow.


The sink before it was refinished - picking up the finished product tomorrow!

Sunday, October 26, 2008

Kitchen Update

Well, we are getting closer and closer to chopping onions! (this has been my catch phrase when someone asks about the kitchen - "I just want to chop something!") We actually have a kitchen floor (that still needs grout) and hopefully the kitchen cabinets will get some work this week or this weekend - we are painting them red with a high-gloss finish.

Here are the latest pics! Enjoy.


Kitchen primed.

Finished paint job (notice the old windows)

NEW WINDOWS!!!


____________________________________________________________________

Floors....a 500 step process!


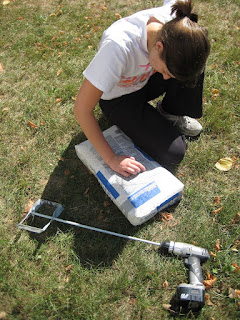
Reading the instructions on the "self-leveling" concrete we had to use on the kitchen floor - very important!


The reason we had to level the floors! When the addition was added to the kitchen, there was some settling that made the floor dip down.

Matt pouring the self-leveler - it looked so much like runny chocolate frosting it was hard to see Matt put it on the floor!


More self-leveling going on....

The subfloor that took 7 hours to do! Matt and his dad worked until 1am and then Matt finished it up at 3am! I owe him something for this...any suggestions?

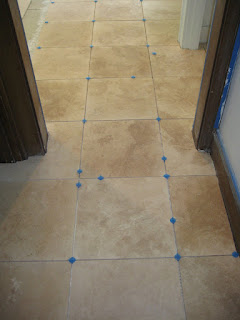
TILE!!! The entrance to the kitchen.


Matt laying the last travertine tile! Matt had some help with the floors. A guy that his mom knew worked with him. While they finished the floors, I worked in the hallway, which is now ready to prime and paint!

Items left to do before I can chop...

1.) Grout and seal tile floors
2.) Get the old sink refinished
3.) Paint the cabinets
4.) Install cabinets and appliances
5.) Buy a fridge on Craiglist
6.) Order countertops