Wednesday, July 30, 2008
Beginning of the Bathroom
OK, enough about wallpaper for a while. Here are some photos from the beginning of our bathroom renovation.
 A pile of the pink plastic tiles we pulled off the wall. The tiles left a substantial layer of hard, dry adhesive behind on the plaster walls.
 We were pleasantly surprised to find that the hardwood floors from the hallway continued into the bathroom. We didn't bother pulling up the blue linoleum tiles, so we went right at the sub-flooring (fiberboard) with the crowbar.
Tuesday, July 29, 2008
Make It Rain
When I tell friends and family that we have to remove wallpaper off every square inch of wall and ceiling space (except for the bathroom and kitchen), their response is usually, "Wow, that stinks. I had to take down a border in a bedroom once. It's a pain..."
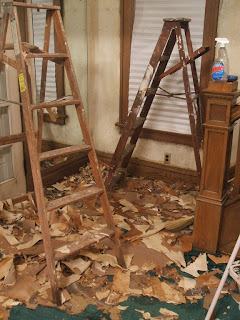
Here are a few pictures to give you an idea of the amount of wallpaper that we have taken down thus far (about five 55-gallon trash bags full to be exact)...


We began the process on the first day with nothing more than a sponge, a bucket full of solution, and a metal scraper - but our wrinkled fingers were a good indication that there had to be a better way to get the same result. We soon wised up and made the best $7 purchase from Lowes in the history of the world. This hand-pump sprayer (typically used to spray pesticides and Weed-Be-Gone) sped the process up considerably.
 Just add one capful of DIF Wallpaper Remover to a couple gallons of water and soak away. Luckily, the plaster walls are resistant to the moisture so we were able to spray the walls over and over again until the paper was literally soggy. The density of the plaster also allowed us to scrape with significant force without worrying too much about scuffing (and later repairing) the walls.
Here are a few pictures to give you an idea of the amount of wallpaper that we have taken down thus far (about five 55-gallon trash bags full to be exact)...
We began the process on the first day with nothing more than a sponge, a bucket full of solution, and a metal scraper - but our wrinkled fingers were a good indication that there had to be a better way to get the same result. We soon wised up and made the best $7 purchase from Lowes in the history of the world. This hand-pump sprayer (typically used to spray pesticides and Weed-Be-Gone) sped the process up considerably.
 Just add one capful of DIF Wallpaper Remover to a couple gallons of water and soak away. Luckily, the plaster walls are resistant to the moisture so we were able to spray the walls over and over again until the paper was literally soggy. The density of the plaster also allowed us to scrape with significant force without worrying too much about scuffing (and later repairing) the walls.
Friday, July 25, 2008
The Writing on the Walls
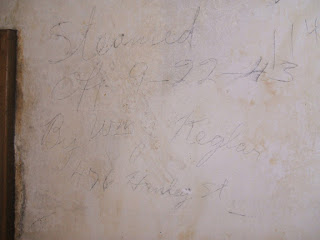
The best part about remodeling an old home is never knowing what you might uncover. According to the Franklin County Auditor's website, our home was built in 1925. This previous homeowners seemed to concur with this information as well. However, what we found under three layers of old wallpaper told us otherwise.


This same name and date appears on the master bedroom walls as well. It is unclear whether C.R. Snapp was a "plaster master", or if he applied the original coat of wallpaper on that date. What is clear, though, is that the house was built before 1925 - at least 6 year prior. I wonder what was happening on November 12, 1919?... ((Prohibition was 2 weeks old and the 19th Amendment was under review which would eventually give women the right to vote.))
Other dates and names appear on the walls periodically, though they are more descriptive about the tasks that were performed. Some include panel and wall measurements scribbled in pencil, and others even included their business addresses. Talk about long tern marketing!


My favorite bit of information we extracted from the inscription above ("Steamed off 9-22-43 By Wm J Keglar, 476 Hanley St.") is that there was at least one more layer of wallpaper hung BEFORE the 3 layers that we took down. Insane. I wonder if people 70 years down the road will feel the same way about us and paint?
We are going to feel bad priming and painting over these little pieces of history, but at least we had the decency to document them and pass them on to the next home owners (if/when we move).
This same name and date appears on the master bedroom walls as well. It is unclear whether C.R. Snapp was a "plaster master", or if he applied the original coat of wallpaper on that date. What is clear, though, is that the house was built before 1925 - at least 6 year prior. I wonder what was happening on November 12, 1919?... ((Prohibition was 2 weeks old and the 19th Amendment was under review which would eventually give women the right to vote.))
Other dates and names appear on the walls periodically, though they are more descriptive about the tasks that were performed. Some include panel and wall measurements scribbled in pencil, and others even included their business addresses. Talk about long tern marketing!
My favorite bit of information we extracted from the inscription above ("Steamed off 9-22-43 By Wm J Keglar, 476 Hanley St.") is that there was at least one more layer of wallpaper hung BEFORE the 3 layers that we took down. Insane. I wonder if people 70 years down the road will feel the same way about us and paint?
We are going to feel bad priming and painting over these little pieces of history, but at least we had the decency to document them and pass them on to the next home owners (if/when we move).
To Mitch Hedberg...
I have to be honest - these pictures are not current. These were taken a couple weeks ago and now I'm just backtracking and scrambling to get as many photos up as possible. The reason? I think it is important to show the progression of the transformation. As Mitch Hedberg (a comedian) once said, "You always see the 'Before' and 'After' photos. Where are the 'During' photos? I'd like to see those..."
Here's to you Mitch:
 The ceiling pieces peel off in large sections if you soak them long enough. It probably helped that there was only one layer on the ceiling.
 It's really not this fun - I promise.
 Here's what the plaster walls look like after you get through three layers of wallpaper.
 The yellow discoloration is mostly old paste. We eventually washed the walls to get rid of 80% of this.
Here's to you Mitch:
Monday, July 14, 2008
Finding Our Home

Hello everyone, and thanks for checking out our little piece of the web. This site will catalog the renovation of our new home on East Tulane Road in Clintonville (Columbus), Ohio.
First off, big thanks to our friend Stacey for finding us our first home. Stacey has lived in the Clintonville area for almost a year now and is an avid runner. Luckily, East Tulane Road is one of the streets she frequents. One morning at work, she mentioned that she ran by "a cute Cape-style house" the night before, that it was For Sale by Owner, and that we should check it out.
So we did.
We drove by the house to take a look, called the phone number on the sign, and set up an appointment to see the inside. Jim and Charlene (the previous homeowners) showed us through the property on a Friday, and we made an offer the following Tuesday. And the rest, they say, is history... [NOTE: There was a bit more that went into the eventual purchase of the property, but for the sake of time and space - we'll save that for another time.]
So we'll start our journey at the beginning... with the BEFORE PHOTOS. Click here to enjoy.
Subscribe to:
Posts (Atom)

