Showing posts with label exterior. Show all posts

Wednesday, May 26, 2010

The Great Outdoors (a.k.a - Our Front Yard)

Summer is here and it's hotter than hell again - which means we've put all those miscellaneous interior tasks on the backburner and moved outside to work on the yard again!

Like many of the projects we have completed over the past two years, conceptualizing and implementing what we wanted to do in our front flower bed came together REALLY quickly once we made up our minds that we were going to do it.

First, a big shout out and thanks to our friend Tim Tolle, who not only helped with the design of both the front and back yard, but also put together a thorough list of recommended plants to use. (NOTE: The first line of Tim's plant list literally reads: "Let’s Talk Plants Dude…")

On Saturday, we did a little "ghetto gardening" - which involved digging up plants that we haphazardly planted around our backyard last summer and moving them to the front yard. There were a couple of tall ornamental grasses that we felt would look good flanking the stairs leading up to the porch, so we started there. Next we dug up a handful of coralbells that our friend Stacey (who found the house for us as well) gave to us last summer and moved them to the front.

On Sunday morning, we took a look at our budget, grabbed a couple coupons, and decided to head over to Oakland Nursery (just across I-71 from our house) to buy the bulk of our plants. For those Columbus residents who have never been there, do yourself a favor and go. I'm about the farthest thing from a true "gardener," but walking through Oakland's campus definitely made me consider taking up the hobby more seriously. Their 10-acre campus is an oasis set in the middle of an urban neighborhood, and their selection is unbelievable. Their staff is ridiculously knowledgeable and helpful, but not overbearing. And their prices were pretty reasonable.

Here are a few shots of the finished front bed:

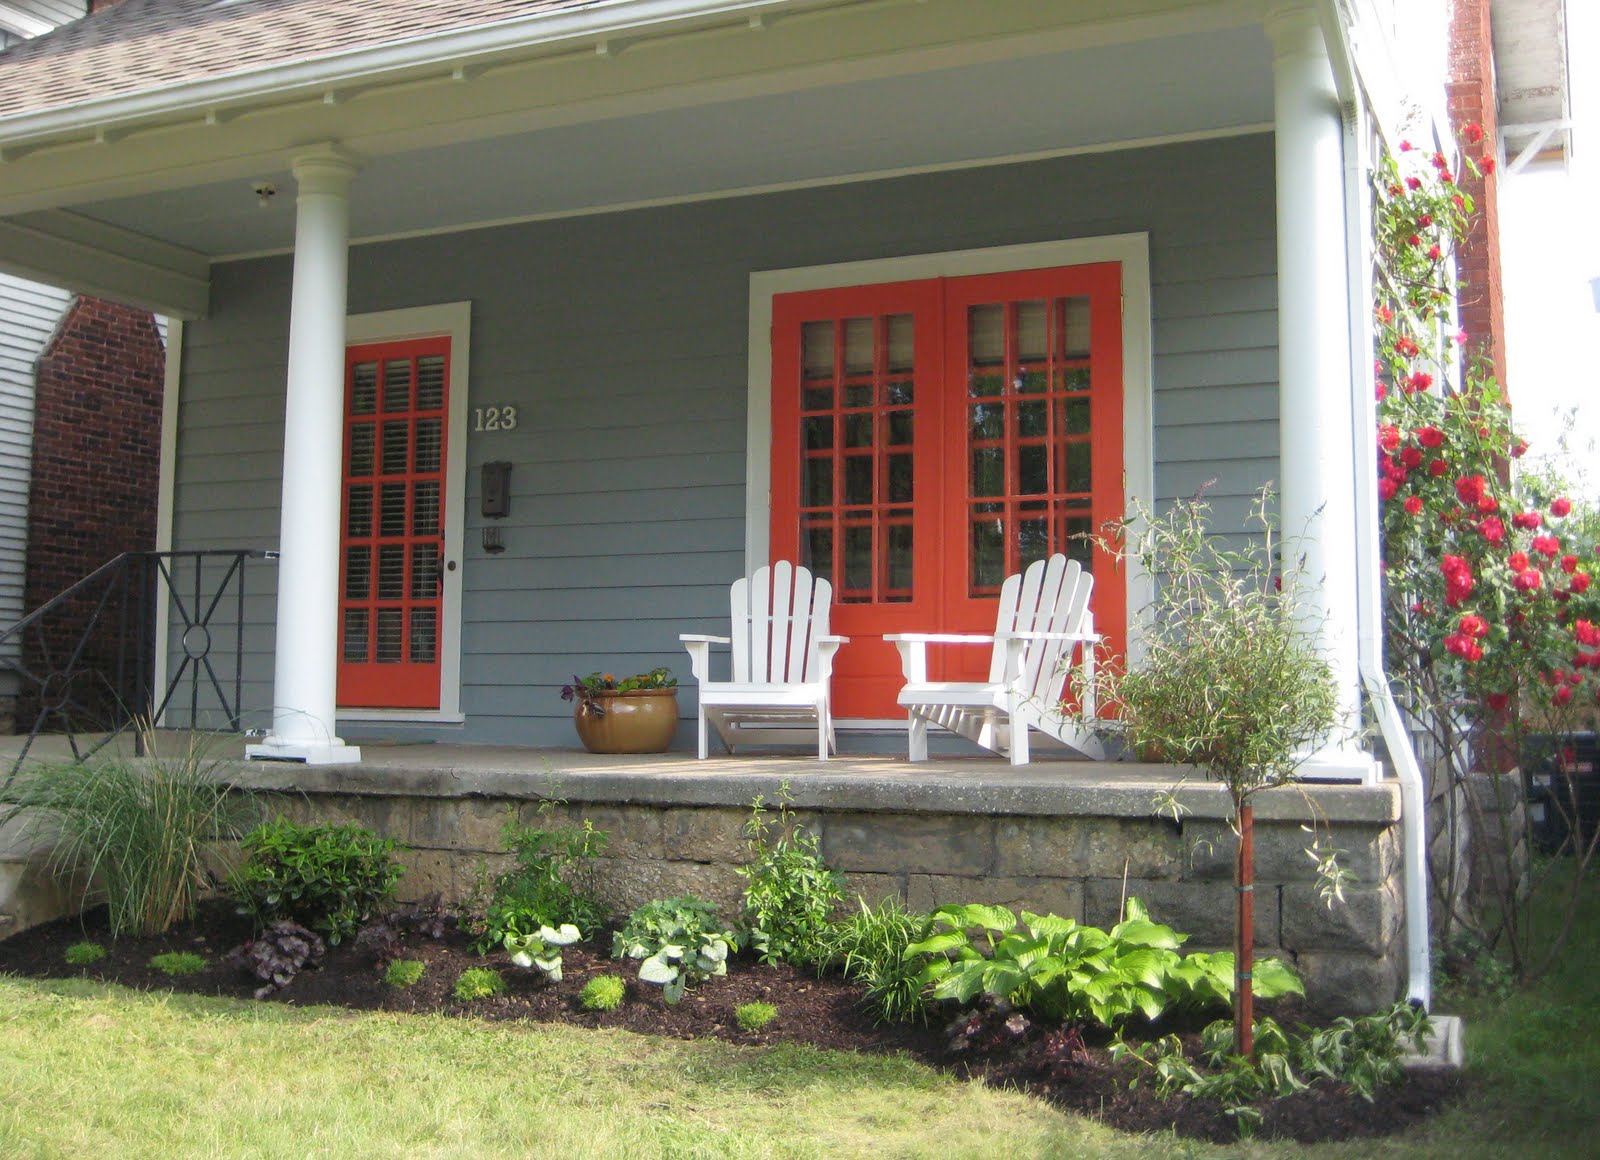
Completed front bed and porch - Hostas and climbing roses (existing) with new gooseneck ground cover, coralbells, white astilbe (2), Jack Frost brunnera (2), Cunningham white rhododendron, and Irish moss (6).

New tree - Petite Blue Indigo Butterfly Bush.


New tree - Close-up of the butterfly bush's flowers.

The front yard came a long way over a short weekend, but it took a lot of hard-work and effort and patience to get things just the way we wanted. So we thought the best way to reward ourselves and enjoy the fruits of our labors would be to install a porch swing.

We actually bought the swing off of Craigslist for $40 two years ago when we first moved into the house, but it was a little hard to justify "relaxing on the front porch" when there were so many other projects to finish first. So we saved it for a special occasion.

Porch Swing - It's actually pretty beat up but photographed really well. We'll be tossing a coat of paint on it sometime later this summer.


Installation - Contrary to popular belief, the trim on a house is NOT solid. Use a stud finder and make sure you tap into something structural.


Success - Swing properly installed and leveled.


The View - Where we'll be spending many evenings this summer.

Sunday, August 23, 2009

More Exterior

Just wanted to post a couple recent exterior pics. Matt worked REALLY hard today as I wallowed around the house thinking of the 119 students that will be replacing my easy-going summer :)

We've decided were about 40% done. Found a house on our street that recently was painted and will most likely use them to help us finish the really high parts.

Thanks to Adam for helping us on Saturday!


Scraped and primed.


Bottom half on the side completely blue!!!


Back touched up with blue and primed at the top.

Monday, August 10, 2009

Latest Exterior Paint Pics

Yesterday Matt and I hustled to get the front and some of the sides done. Here are the latest pics. Enjoy!

Front BEFORE!

Front AFTER!!!


Back before.

Back after.

More from the back.


Side before.

Side after.

Wednesday, July 22, 2009

Orange Door

One door down, two to go. We really like how the color turned out! We still need to prime and paint the top part of the house.


Sunday, July 19, 2009

White No More

Don't have much time to type a lengthy post, but here are some pictures of our most recent progress on the exterior. Enjoy!


Thursday, July 16, 2009

Blue Skies

We've been busy trying to get this house painted....it's a slow process but I know it's going to pay off. So far we have the lower level primed all around the house and the front porch ceiling painted sky blue! We liked the idea of a blue ceiling from traditional southern homes - they love their porches down south!


Still need to prime the overhang on the porch - but this is a good pic to see the blue porch ceiling!

Porch Ceiling


We decided to go with the top, lighter color. We are going to accent it with a coolish gray-white trim and bright orange doors.


Oops, how did this picture end up in here???

Wednesday, June 24, 2009

It was a really hot day...

I finally started priming the house today!! I picked up primer at Sherwin Williams that would fill in all the cracks in the old paint job. There was a little more prep work to do on the front and back. After a few hours I started painting.

Bad news - It was super hot today.
Good news - I got a little bit of a tan and hopefully burned a few calories!

The primer looks good, although you can still see some of the "alligatoring" from the previous paint when up close. It looks great from the street though. I can't wait to see what it will look like with some color! We've been staring at the white for so long. We decided to go with a Valspar color from Lowes (Woodlawn Juniper). We will get the color matched at Sherwin Williams.

Tomorrow I will start priming again and hopefully get all the low parts of the house - I would rather not get on a 32 foot ladder like Matt and Adam!


I decided to save all detail work (windows, doors, etc) for last. Can you tell?


Top part is too far to reach on a "normal" ladder - therefore I won't be doing it.


Left side (primed) - right side (not primed) - obviously :)


Our adorable pup admiring the new paint job - door still crappy looking though!

Tuesday, June 9, 2009

"Did you eat a lot of paint chips as a child?"

"(giggle) No, why?"

Alright, enough Tommy Boy references. Let's get down to business...

After a day of dry time, we got to work on the wood siding of the house again.

We had a friendly bet going about how much of the "alligatoring" paint the power washer would remove and how much additional hand-scraping would be required to get everything ready.

The East side of the house, post-power washing/pre-scraping.

The good news: I won the bet. Three-thousand PSI of water pressure isn't nearly enough to break away 40+ years of brittle oil-based paint.

The bad news: We need to scrape the entire exterior by hand.


One of the many trim boards being scraped with a 5-in-1 scraper.

It was easy to tell that the house was (at some point) painted with an oil-based paint and/or primer because the paint simply flakes off in bits and pieces. Had it been an acrylic-based paint, the chips would bend or flex before breaking. In some areas, the paint peels right down to the bare wood. In other spots, it still maintains a remarkably strong bond.

Exposure to the elements definitely makes a significant impact on certain areas of the house. The South (or back) side of the house receives the most sun throughout the days, and it shows. The only parts that didn't need too much attention were the areas directly under the soffit (roof line).


All of the trim around the windows and doors were in especially rough shape. I have a feeling this was due to a few factors:
  1. the wood used on the trim had a smoother finish than the rough-cut siding, giving the paint less surface area to hold onto
  2. these surfaces were not properly prepped/primed before the paint was applied

The side door after 30 minutes of sanding.


The East side of the house after scraping.

After spending most of the day Friday and Saturday scraping and sanding, our sore bodies begged us for a day off - and we complied. We did manage to remove the outer veranda doors from the front of the house that had been painted shut. Now we need to find a local refinisher to help us strip the paint off them so we can put a really nice finish coat on them before the end of the summer.

Exterior paint color reveal - COMING SOON...

Sunday, June 7, 2009

Water + Pressure = Clean Siding

This week we got a kick in the pants from my brother, Adam, who volunteered to help us with the exterior of the house. Adam used to run a painting business during the summer, so we were excited to get the extra help since he clearly knows what it takes to get the job done right.

So I made a few calls, lined up a 32' ladder and a moving van, rented a power washer, and we were off and running.

Thirty-two foot ladders are much longer than one might expect.


We didn't have a ladder rack to use, so we elevated the 32-footer using a step stool and a LOT of bungee cords.


Once the ladders and equipment were in place, the weather decided to take a turn for the worse. What had been a warm, dry start to the week quickly changed to cold, wet, and dreary. The cold water from the faucet mixed with the falling temperatures made for a long and difficult process.

Nevertheless, Adam got to work power washing all of the siding, soffits, and fascia. Because the house hadn't been washed in years (probably decades), loose dirt and paint poured off the walls in sheets. Here he is on the fully-extended ladder stretching into the neighbor's yard, and a home-made poncho fashioned from an over-sized trash bag.

Saturday, September 27, 2008

The Human Tornado

The Human tornado...this is my dad's new nickname. He comes in with a fury, demolishes a job (in a good way) and is gone in the blink of an eye. His latest storm was in the back yard and the kitchen.

I get a call a week ago while I was running errands and it goes something like this:

Dad: I am going to start cutting some of these branches off your tree.

Me: Ok, I'll be home in an hour. DON'T get on the ladder by yourself.

Dad: Ok, see you in a bit.

Me: DON'T GET ON THE LADDER BY YOURSELF.

One hour later....

Now we just need to bundle these and get them to the side of the road.


Please note the LADDER! There used to be branches right above where my dad is standing!


The next tornado hit the kitchen. Yesterday before Matt got home from work, my dad and I took out the kitchen sink and sink cabinet so we could start laying the tile floors. Within an hour, we had quarter turn shut-offs on the water supply lines, a sink on the kitchen floor and a cabinet removed from the wall.

BEFORE


AFTER


Friday, August 1, 2008

SketchUp Model

I'm a bit of a geek when it comes to 3D modeling. While majoring in Industrial Design at the University of Cincinnati, we were required to learn Alias (a high-end surface modeling program used to design products). Since I haven't used that program in 3 years now, I have retained about 4.3% of what I used to know. Learning Alias did, however, prepare me to use more basic programs such as Google Sketchup - which I use at work and at home for personal projects.

Google SketchUp is a bit finicky, but overall it serves as a great tool to build rough spaces quickly to use as underlays. It also has a decent "color blocking" feature that allows you to color walls and surfaces with paint colors or textures (brick, roof tiles, fencing, etc.). This has allowed us to visualize how different rooms would look with various color schemes.

If you're so inclined, download SketchUp for free and play around with it a bit. I found it really tricky to use until I switched all of the keyboard shortcuts to mirror those of the Adobe products (Photoshop, Illustrator, etc.). SketchUp certainly has its limitations, but for a free program - it's pretty darn useful.


Pretty accurate depiction of the front of the house.


A view of the 2nd floor layout (with ugly, random colors).


A view of the 1st floor layout.


POV from the front of the Living Room, looking through to the dining room. Don't you just love the sofa and painting above the fireplace?


Bird's eye view of the bathroom layout.